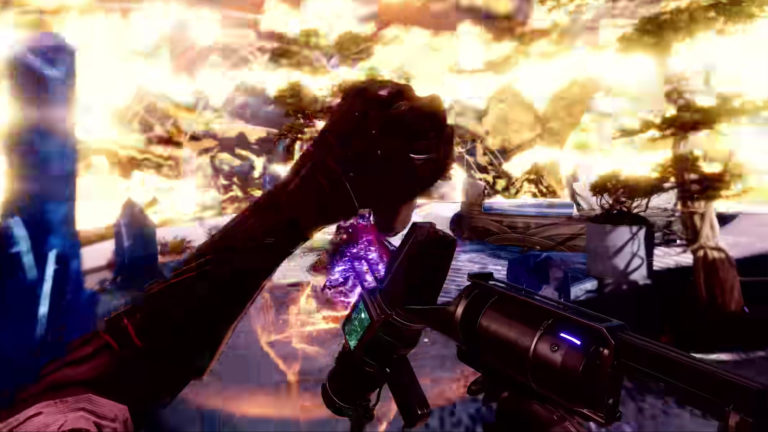
The new raid Deep Stone Crypt is a medley of frozen Europa land, a top-secret facility, and a space ship attempting to destroy our beloved icy planet. Time and the cold are your enemy. Crash the ship that aims to destroy Europa, defeat Taniks, and coordinate with your team for victory!
Before we jump into each encounter, let’s discuss some core components of the raid. The trend in the Deep Stone Crypt raid is a combination of three buffs that see, stun, and control the environment around you. This guide is not short and sweet, it is in-depth. We tried our best to describe each roll and all the mechanics thoroughly so that you can enter this raid with confidence and a deep understanding.
Table of Contents
Buff Mechanics

Operator
The Operator or Red Buff is the control. He or she with the Operator Buff earns the capability to press buttons and open doors amongst other obscure tasks like popping bubbles in the final encounter. In other words, in this facility, the operator can operate the building and control functions within the building.

Scanner
The Scanner or Yellow Buff can see what others can’t. They locate which objects are active for each encounter. With the Scanner buff, active objects will glow yellow.

Suppressor
The Suppressor or Blue Buff stuns the boss in the third and fourth encounter. This Suppressor Buff is combined with a trio of floating drone balls that will glow blue when the time to stun the boss is active. The Suppressor will need to stand under the drone ball, shoot the boss, run to the next ball, shoot the boss, and then run to the third and final ball and shoot the boss. The third time will trigger the stun.
Pre-Encounter Sparrow Challenge: Locate the Deep Stone Crypt
Step one of this raid is to endure the cold while locating the entrance to the Deep Stone Crypt. Traverse the land via Sparrow and find the entrance. You are looking for another Chamber door that will only open once everyone inside the raid is inside (AKA all 6 players). You cannot pull players who are having trouble. But there is a way around this.
In this sparrow encounter, if a member of your team is having too much trouble and you don’t feel like waiting for them, have them go to orbit and wait. The rest of you run to the first encounter. When you reach that first encounter have them join back. This is the only way to “pull” them, there is no “join fire team” in this pre-encounter.
SHELTER FROM THE STORM BUFF CHEESE
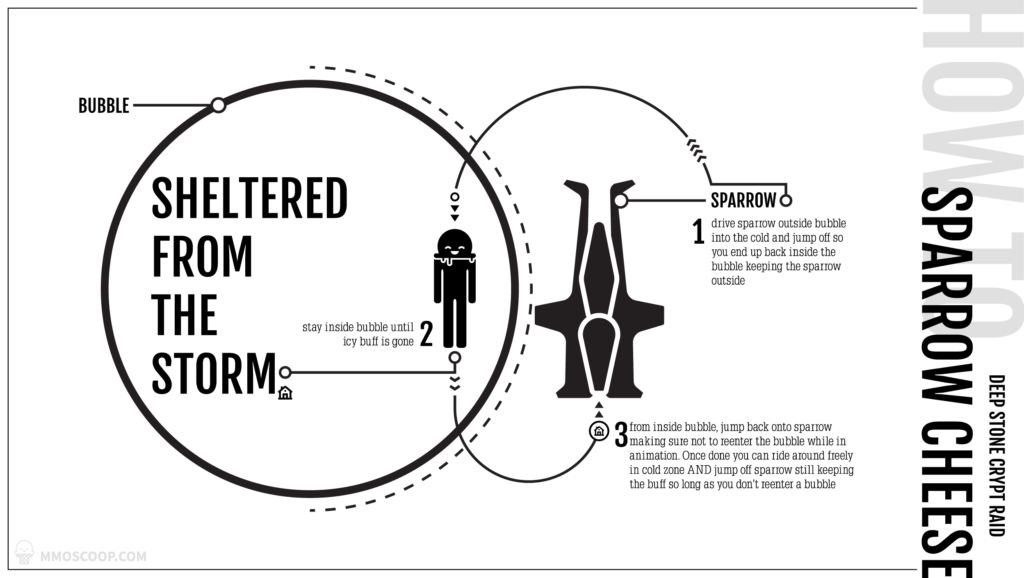
BUNGIE HAS UPDATED THIS GLITCH. THE NEW WAY TO REPEAT THIS GLITCH IS TO DO THIS SAME PROCESS OF JUMPING ON AND OFF SPARROW ON THE ENTRANCE DOOR. PUT YOUR SPARROW OUTSIDE THE DOOR, JUMP OFF BACK INTO THE CHAMBER ROOM AND THEN GET BACK ON YOUR SPARROW THAT IS OUT IN THE COLD. AVOID THE BUBBLES ALTOGETHER. I LEFT THE DIAGRAM BECAUSE THE PROCESS STILL APPLIES BUT INSTEAD ITS EFFECTIVE VIA THE ENTRANCE CHAMBER DOOR. VIDEO DEMO BELOW.
For those who have trouble with this encounter, you are in luck. There is a way to cheese the Sheltered from Storm buff to prevent taking damage from the cold.
What you want to do is get on your sparrow and take it slightly outside the bubble where you see the cold damage starting to accumulate. You need to be really close to the bubble but not inside the protection. Line up your sparrow so that you are parallel to the bubble wall, bubble being on your left side (for dismount animation).
Okay, so you’re on your sparrow parallel to the shelter bubble on your left side, in the cold taking damage… Dismount your sparrow, leaving the sparrow outside the bubble, which should have popped you back inside the shelter. Wait until the cold is removed from your body, and you only see the “Shelter from the Storm” buff.
Now, from inside the bubble mount your sparrow. I like to start to drive away from the bubble as I’m mounting my sparrow to prevent myself from swaying back inside the bubble. If you did this correctly you will have the sheltered from the storm buff while outside of the bubble on your sparrow. Beware if you reenter any of the bubbles at any point you will have to reset and repeat this process.
Using this cheese helps you find your way and explore this area freely. Once you have the buff outside you can dismount the sparrow if needed. The sparrow is only necessary for activating the cheese, but if you feel more comfortable running the whole way you are free to do so now that you have the sheltered from the storm buff active while outside the bubbles.
SPARROW CHALLENGE WITHOUT THE CHEESE
Once you get through the chamber door you have to survive the cold to make it to the Deep Stone Crypt. The way to do this is to sparrow bubble to bubble.
The bubble is a safety bubble that will stop the cold from killing you. While inside these bubbles you will see a “Shelter from the Storm” buff appear on the left side of your screen. The bubbles will have enemies and a Dark Counselor enemy (mid-tier enemy) so beware.
You are looking for a cave with another chamber door. Once through this chamber, the cold air is no longer an issue. You can freely ride your sparrow through the cave and up the mountain to get to the building.
Follow the snowy path to find the large door cracked open.
First Encounter: Disable Crypt Security
Defeat the security to breech the Deep Stone Crypt in this first encounter. This first encounter in the Deep Stone Crypt Raid introduces two of the core mechanics seen throughout the entire raid. These mechanics are the two buffs in this room: Operator (red buff) and Scanner (yellow buff).
Important to note that you can transfer these buffs from person to person by using the Augment Terminal. Only one buff can be in the Augment Terminal at a time. If a Servitor is alive these terminals will not work, so kill these enemies quickly.
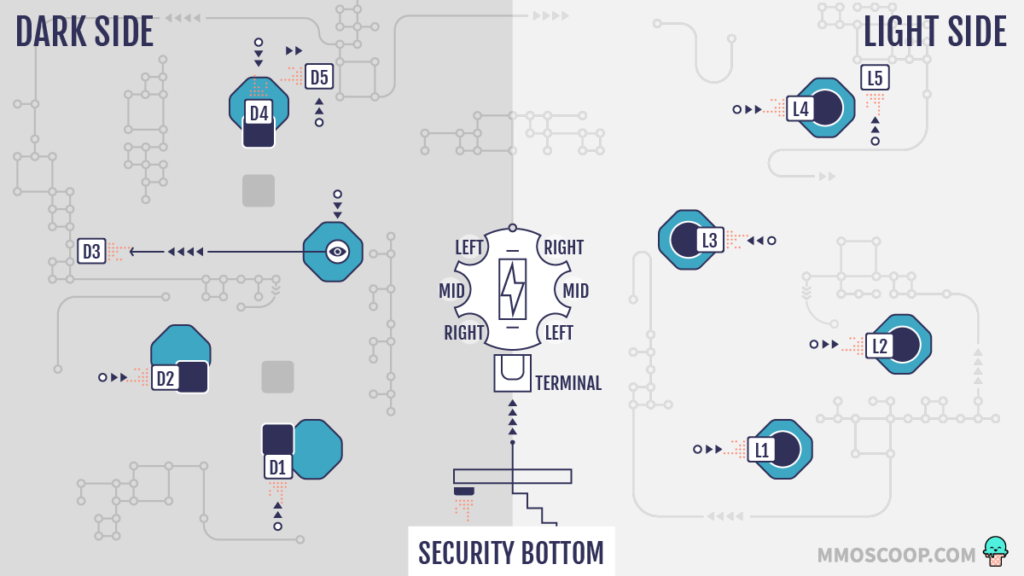
Sides of the Room: Light and Dark
This security room is split into two areas; a light side and a dark side. The side of the room in which you entered this encounter is considered the Light Side.
There are a few visible indicators besides the lighting. The Dark side, both upstairs and down below in the Operator room will have square pillars.
The Light side of this encounter will have cylinder/round pillars with bubbling water inside. So if you are confused about which side is which, look at the pillars to determine if you are on the light or dark side.
SCANNER BUFF: FIRST ENCOUNTER
The Scanner buff can see the active terminals to shoot. These terminals/buttons will be glowing yellow. Find and kill the Vandal on the Dark Side with the buff to obtain the Scanner buff.
Scanner buff stays up top and looks through the floor to view which button/terminals need to be shot by the Operator downstairs. All buttons are visible via the glass windows on the floor. (diagram above)
You will need a person on each side of the room (the Light and Dark sides) to view the buttons down below because once the encounter starts the doors between each side will be locked. So, you will need to pass the scanner buff to a member on the Light side via the terminal so they can call out which two buttons are active on the Light Side.
If you don’t have two people that understand the Scanners role, the operator can open the door so that the person with the Scanner Buff can cross over into the Light Side and view which buttons for the Operator to shoot.
OPERATOR BUFF: FIRST ENCOUNTER
The Operator Buff in the first encounter starts in the Augment Terminal. The operator can open the doors and shoot buttons downstairs. The purpose of the Operator is to go downstairs to shoot the 4 active buttons determined by the Scanner.
You need to be the Operator buff to enter downstairs as well as shoot the buttons. They all will be glowing red; the Scanner is the only one who can see which buttons are the right ones to shoot. You will need to shoot 4 of the 10 buttons.
To enter the downstairs area run to the far side of the room from where you entered this encounter, the opposite side of the raid banner placement. You can access this chamber from both sides (Light and Dark).
Only one person with a buff can enter the operator room downstairs. The door will not open if another member is in the chamber with you. Once the operator makes it downstairs the operator will see a bunch of pillars and an Augment Terminal. The Operator should run down and get familiar with this layout before the encounter starts. The Dark side has square pillars. The Light side has cylinder tubes filled with bubbling water.
Teams like to number these buttons for quick easy communication because once you go down into that room a timer starts. If you shoot the wrong button or take too long this room will light on fire and kill the Operator instantly.
In my diagram above you can see how we have chosen to number them, some teams like to do this in reverse, but we have gotten used to these callouts so this is how I’m going to suggest the callouts. I have some reasoning behind this, but we can debate this later.
I prefer to wait to go downstairs into the Operator room until the Dark Side has called their buttons. This ensures I have enough time down there giving Light Side a fair amount of time to find the buttons without feeling rushed.
Burn Phase: FIRST ENCOUNTER
Now you’ve pressed all four buttons burn phase will initiate. The security wall protecting the Fuse Cores in the center point of each room will open up allowing players upstairs to damage these cores. DO NOT SHOOT THEM. Your Operator down below will tell you which order to shoot these cores to prevent a wipe sequence. But first they will need the Scanner Buff.
Okay, so the Operator needs to head back to the Augment Terminal to trade their Operator Buff for the Scanner Buff as soon as he/she shoots the fourth button. Someone up top grab the Operator Buff so Scanner can pass the buff down.
Now the Scanner is downstairs. Stay near the Augment Terminal and lookup. You will see 6 cores above the terminal correlating with the cores up top. With the Scanner buff, one of these 6 cores will be glowing yellow. Your job is to call out which cores to shoot.
How we label this is Dark and Light, and cores are Left, Middle, Right. So, the three cores up on the left side of the terminal are the Dark Cores. The Right Side is Light Side. This is less confusing than Left Left or Right Left. It just gets messy, so I recommend getting comfortable with which side is Dark and which is Light so that you don’t confuse your team (remember square pillars are dark side).
An example of a callout would be Dark, Middle. Your team on the Dark Side of the room kills the Middle Fuse. You will hear an audible sound of the core fizzling out, the person below will see the glowing yellow fuse go dark, and another one will light up. Repeat this process 6 times until all cores are killed. This can be done in one phase, however, if you don’t have the damage and the speed the first process repeats (shooting buttons).
You will have to reshoot buttons, so send up the scanner and repeat this process once again. It is best to let out the person below so that they don’t die down there because like I said before, that room is on a timer and will implode if you don’t move fast enough.
Destroying all the cores beats the encounter and all doors will open, including the entrance to the next encounter. You will find the exit on the dark side, the chest for beating this encounter will be right next to it.
Second Encounter: Clarity Control
This encounter requires players to identify which Atraks-1 replica to kill each burn phase until final stand. You will need to coordinate with your Control team and Orbital Team (team that goes into the space room) in order to transfer buffs and keep this encounter from wiping.
Three buffs in this second encounter; the Atraks 1- Replication buff, Scanner buff and Operator buff. Two rooms; Orbital (Space) and Control.
SCANNER BUFF: SECOND ENCOUNTER
The Scanners job is to locate the Atraks Replica to kill during the burn phases. The Scanner is shared between both rooms, get familiar with the terminal locations. Always pass the Scanner buff before purging a Replica buff.
OPERATOR BUFF: SECOND ENCOUNTER
Operators’ job is to manage the Atraks-1 replica buff and send the elevators. Operator, make sure your Control team has elevators to get into space to purge the buff. No other player can remove a replication buff. Operators need to be able to juggle multiple tasks at once.
ATRAKS-1 REPLICATION BUFF
This buff is dropped after you properly identify and kill each Atraks-1 replica. This buff is on a timer and if not managed will respawn a replica that will wipe the encounter. Players need to grab this buff and coordinate with your Operator to purge this buff out into space. This buff will be on a timer while on a body as well as on the floor. It can be shot off a player’s head to reset the timer if there are no active Airlocks but don’t let it sit for too long. It should always be on someone’s body or out in space.
MECHANICS OF THE SECOND ENCOUNTER
Two teams of three. Orbital needs a Scanner and an Operator. Control only needs a designated Scanner. This leaves three players without defined roles. These three players need to do burn damage as well as pick up the Atraks-1 replication buff and bring it to the Operator in space to be purged.
Waves of enemies will spawn. Kill them to activate the Servitors. When the Servitors spawn the buffs will spawn with them. Control room will spawn the Operator buff. Operator wait in Control until you can pick up the buff, then head up into space.
Killing all Servitors will activate the burn phase (make sure scanner buff has been picked up). Four rounds of burn phases if not in final stand by then another round of servitors will spawn. (Kill and repeat if necessary).
The first burn phase will happen in space. Scanner will identify which enemy to kill, all players in that room follow the Scanner and wait for them to countdown to initiate the damage. This damage phase is on a short burst timer. You all want to be ready to do damage, but taking too long to get there will also wipe the encounter.
After Orbital kills their first replica the Scanner needs to immediately find a terminal and send the Scanner buff down to Control. Now it is the Controls turn to kill their replica when it spawns.
Meanwhile, up top in space, the Operator should be coordinating with the player that picked up the Replication buff. Operator calls out which Airlock is active. Operator will open the Airlock, the player with the replication buff needs to enter this airlock so that the Operator can shoot this buff off your head and out into space.
Control, once you finish your first burn, Scanner needs to send the buff back up via the terminal and the player that picked up the Replication buff head into space ASAP. You will be arriving just before or during the next burn phase up in Space.
Once space has burned for a second time the player with buff from control and the newest buff from space will both purge their buff in an Airlock. Once the buffs are gone the player from Control should head back down. Repeat this process until final stand.
Final Stand will require all players to head up into space. Operator needs to make sure all the elevator pods are ready for the Control group so they can all make it up into space quickly before the final burn phase starts.
Once in final stand, all players head up top to juggle Atraks-1 replica buffs and kill the remaining replicas to beat the encounter.
BURN PHASE: SECOND ENCOUNTER
The first chunk of the health bar on Atraks-1 is damageable by killing the Atraks-1 replica that glows yellow for the Scanner. Try to get as much damage on these enemies as your team can. This will chunk the health bar down and keep your team from running out of time.
The second chunk of damage is the final burn phase. Everyone comes up to space room and the person with the scanner calls out which replica to burn down. Kill each replica to beat the second encounter.
Jumping Puzzle
Jump around the outside of the space ship in order to reach the next encounter. There is a chest about mid-way through this jumping puzzle.
Third Encounter: Prevent Europa’s Destruction
This encounter is a repetition encounter, 6 rounds of coordination in order to stop this ship from blowing up Europa.
Elements in this encounter:
- Operator Buff
- Scanner Buff
- Suppressor Buff
- Nuclear Cores
- Deposit Bins
SCANNER BUFF: THIRD ENCOUNTER
The Scanner will call out which two of the four bins to deposit the Nuclear Cores into. A woop woop sound will initiate each phase, at which time the bins will begin to glow yellow.
Call outs are as follows. The Deposit bins are four bins in the center of this room in a square type formation. (image above) The orientation of the room is looked at from the position we enter the room. There are two bins left side, two right side and the top/window/boss or bottom/spawn.
OPERATOR BUFF: THIRD ENCOUNTER
The Operator spawns the Nuclear Core balls. The cabinets where the balls spawn have a button directly next to/above its spawn point. The operator will see some of these buttons glowing red when the phase starts (woop woop sound). Shoot one of the red buttons to spawn balls.
If the Operator does not shoot a button within the time frame, three balls will spawn and a third bin will glow yellow for the scanner. This method of three balls will speed up this encounter, making it so you only have to deposit in five rounds instead of six. However, I find that it’s hard enough to get players to manage two balls, chaos ensues when you have 3 (especially in LFG).
SUPPRESSOR BUFF: THIRD ENCOUNTER
The Suppressor buff is a new mechanic added for this encounter and the final encounter. The purpose is to stun the boss and activate the Deposit bins. The Deposit bins will be “offline” until the Suppressor finishes stunning the boss.
Using the Suppressor buff requires a player to stand under the floating drone inside the blue light and shoot the boss. Do this under all three drones to stun the boss.
The hardest part about this job is getting to the stun points. The boss likes to stomp so it is recommended that the player stunning should start at the drone closest to the boss because 2/3 stun points are on a top ledge and it is highly likely you will get stopped mid-jump flinging you far from your stun point. Since you are on a time limit you want to get there fast with little resistance.
NUCLEAR CORES: THIRD ENCOUNTER
Each round two guardians will have to grab these Nuclear Cores and run them to the Deposit bins clarified by the Scanner Buff. You have 10 seconds to get to the newly spawned ball or it will wipe the team.
These cores leak radiation and will poison the players with a Radiation Buff. 10 stacks of radiation will kill the player. This is why it is important for the Suppressor to move quickly. Too much radiation will kill the players and drop the ball.
Balls dropped have a 10-second count down and will explode wiping the team if not picked up.
NON BUFF PLAYER ROLES
Players without a buff need to pick a buddy with a buff in case their buff deactivates and it needs to be traded. In addition, players without buffs spread out; one right, one left, and one middle. Your job will be to pick up the Nuclear Cores and deposit them into the Deposit bins defined by your Scanner buff.
DEFEATING THE THIRD ENCOUNTER
Waves of enemies will spawn constantly. Within these waves, the three buffs will spawn on three separate enemies. Three Players grab one of the three buffs. Every stun will deactivate one of the buffs (scanner, suppressor, operator). When deactivated put it in the Augment Terminal for another player to pick it up.
If a player dies with a buff and it is not picked up within the time limit, it will respawn on an enemy again. When a person picks up a buff and deposits it in a terminal they gain a cooldown timer making them unable to pick up another buff for 30 seconds. Therefore, everyone in your fireteam needs to be familiar with the various roles.
Okay, so a woooop woooop sound will alarm. At this time buffs start to activate their objectives. Operator find your button and shoot it to spawn the Nuclear Cores. Scanner, look at the Deposit bins, and call out which two are the active yellow bins. Suppressor, as soon as the blue lights are visible, stand under them, shoot the boss and run to the next.
Players without a buff need to spread out to be ready to pick up a Nuclear Core. The two far balls (left and right) are most likely what will wipe your team. You either need players ready and waiting or massive mobility to be able to get to these balls before they wipe your team.
Grab the balls, put them in the Deposit bins, rinse and repeat. You will repeat this process 6 times. Green lights below the bins tell you how many rounds have been completed. After your sixth round, the encounter will end and open up your exit in the center of the room. Jump down and run to the exit pod. You are headed back down to Europa to the final encounter, defeating Taniks. The chest for defeating the third encounter is available after you land back on Europa.
Fourth Encounter: Defeat Taniks The Abomination
The final encounter has all the same elements as the third encounter; Nuclear Cores, Nuclear Core Deposit Bins, Suppressor Buff, Operator Buff, and Scanner Buff. In addition, we have added three sides to pay attention to; Spawn side, Orange side, and Blue side. This encounter takes place at the entrance of the facility, only now it will be covered in debris from the destroyed space station.
In the Fourth Encounter of the Deep Stone Crypt Raid players will need to pick up the three buffs (Scanner, Suppressor, Operator) and deposit Nuclear Cores in order to initiate boss burn phases. There are two strategies, a two-ball method and a four-ball method. First let’s go over what each buff is required to do.
OPERATOR BUFF: THIRD ENCOUNTER
The Operator in the Final Encounter to defeat Tanniks is the player that purges the Purple Bubble Cage from players as they are running the Nuclear Core balls to the Nuclear Core bins. Operator is very important, watch all four of your players, and listen for audible cues, the longer you leave a teammate in a cage, the more radiation they accumulate, the less time they have to make it to a Deposit Bin.
Operator should NEVER pick up a Nuclear Core.
SCANNER BUFF: THIRD ENCOUNTER
The Scanner can see which two of the four Bins are “active” to deposit the Nuclear Cores. Scanner is important if you are running two Nuclear Core balls. If you are running four balls, Scanner is not necessary, HOWEVER still pick it up. Every suppression a buff will deactivate so you will need to lessen the odds of your Operator being deactivated.
Call for the bins are 1 through 6 clockwise starting at the first bin in the spawn section (diagram above). I have seen players call a “side”/right/left (example – Orange/Right) as well but this is a bit confusing and it is cleaner to just learn the 1 through 6 callouts.
A Scanner can pick up a Nuclear Core if necessary (especially if running the four ball method).
SUPRESSOR BUFF: THIRD ENCOUNTER
The Suppressor will stun the boss which activates the Nuclear Deposit Bins. There are three sides; Spawn, Orange and Blue. Every round the boss will randomly select a side, Suppression will activate directly on the bosses location.
After dropping the Nuclear Cores you will hear an audible cue and the Suppressor terminals will activate (begin glowing blue). This is not immediate, it’s a couple seconds after dropping the Nuclear Core Balls.
There are three Suppressor terminals to shoot and run through, they will glow blue when active. Player with Suppressor buff needs to stand inside each of these blue circles and damage the boss. After the third terminal, you will stun Tanniks and activate the Deposit Bins.
The fastest way to achieve this is by shooting a single Anarchy shot onto the boss and running through the blue circles. Anarchy does continuous damage; therefore, you do not have to stop and shoot, you just have to be inside a blue circle as damage is ticking.
Another tip, Operator and Suppressor like to coordinate to avoid Operator getting suppressed before they can pop the second Purple Cage. Suppressor, do your job as normal but wait until the Operator shoots their second cage before finalizing your suppression.
Suppressor NEVER picks up a Nuclear Core, they are too busy stunning the boss.
NUCLEAR CORES: FOURTH ENCOUNTER
Tanniks will move to a side (Red, Spawn, or Blue) once he gets there he activates (there is a charge up subtle sound). The Four glowing lights around his body become damageable. They are red glowing jar/light looking objects located around the lower ring of his body. You have to damage each ball enough for them to drop onto the ground. This is where you control which strategy you are going to do; two balls or four balls.
TWO BALL STRATEGY
If you are going to only run two balls at a time only shoot two lights, which will drop two Nuclear Cores. The Scanner will call out which Deposit Bins to run the Cores to. Your Operator and Suppressor will be busy, the rest of the four players (Scanner included) will be running the Cores to the Deposit bins called out by the Scanner.
Split off into two groups, one group for each ball. One person from each group picks up a Nuclear core. The second person in the pairing should follow their buddy, when their radiation gets too high, take the Nuclear core and continue running to the Deposit bin. Deposit once suppressor is done suppressing.
Repeat this a second time to initiate a burn phase. During the burn phase, Tanniks will go invulnerable temporarily and push everyone out of the damage bubble. Jump back in and continue damaging (two rounds of damage in one burn phase). After the damage phase is over rinse and repeat.
FOUR BALL STRATEGY (CORE FOUR CHALLENGE)
In the four-ball Strategy players shoot all four Nuclear Cores and run them to all available Deposit Bins. When running four balls active Deposit bins is all the bins opposite of the boss. So if Tanniks travels to the Spawn side, then Deposit bins 3, 4, 5 and 6 (blue and orange bins).
Operator and Suppressor do their jobs while the rest of the team each grabs a Nuclear Core and run them to the bins, this is a timed trial because you have up to 10 radiation to get your Nuclear Core into a Deposit bin. The Suppressor cannot slack, they need to be quick, same for Operator (don’t let your fam get stuck in those purple cages!!)
With this strategy, you get three rounds of damage in the burn phase. Tanniks will bump you out of the damage bubble twice, giving you more time to damage. With this method players (and myself personally) have been able to easily one phase this final encounter.
BURN PHASE: FOURTH ENCOUNTER
To defeat the fourth encounter, and kill Tanniks the Abomination in the Deep Stone Crypt players have to deposit nuclear cores that activate burn phases.
How a round works. Enemies will spawn in all three sides. To get the buffs, kill the waves of enemies at each of the three sides. Kill the Captain with purple shields to spawn the buff wave. Each side spawns a different buff. If your buff is lost you have to get it from another vandal back at the original section in which it spawned.
- Spawn side or Grey side will spawn the Operator buff.
- Blue side spawns the Scanner buff.
- Orange side spawns the Suppressor buff.
Tanniks will move to a side and the cores will light up. Shoot the Cores (two for two ball method or all for the four ball method see above). Players grab their core and run them to the deposit bins. While players are running the cores, Suppressor is doing their part.
Operator is watching the running players ready to shoot the Purple Cage that randomly locks one of the runners up. After Operator pops his second bubble, Suppressor should be finishing up suppression which activates the Nuclear Deposit Bins. Ball runners deposit their balls.
Once four balls are deposited burn phase starts. If you are running two ball method you will have to do this process twice before the burn. Four ball method activates the burn phase after one round of depositing Nuclear Cores.
Burn Tanniks and repeat this process until your team has killed all but ~ 10% of the boss’s health bar. The last ~ 10% Tanniks will bounce around the map randomly to the different sides. Chase him around and do damage until he is defeated. This is a damage check, if you don’t kill him before time runs out you wipe and have to restart.